We purchased our Airstream in March 2017, which means that we have now owned it for over 5 years.* The Airstream has lived outside for all of those 5 years, the majority of the time in salty coastal environments. Traveling full time for several years didn’t allow much time for major maintenance on the rig (translation: too busy seeing the sights to do boring maintenance work). Plus there’s the challenge of finding a campground that would allow for work to be done, since most places have fairly strict prohibitions on activities as simple as washing an RV. I could easily come up with several more excuses. But in any case, now that the Airstream is parked on our own property, and we are living in the house full time, we finally tackled some long-deferred maintenance on the rig.
*Fun fact: in the course of hanging out underneath our chassis, I found a label from the original production line with a completion date of August 22, 2016. So it’s even older than the purchase date would suggest.
Corrosion Control
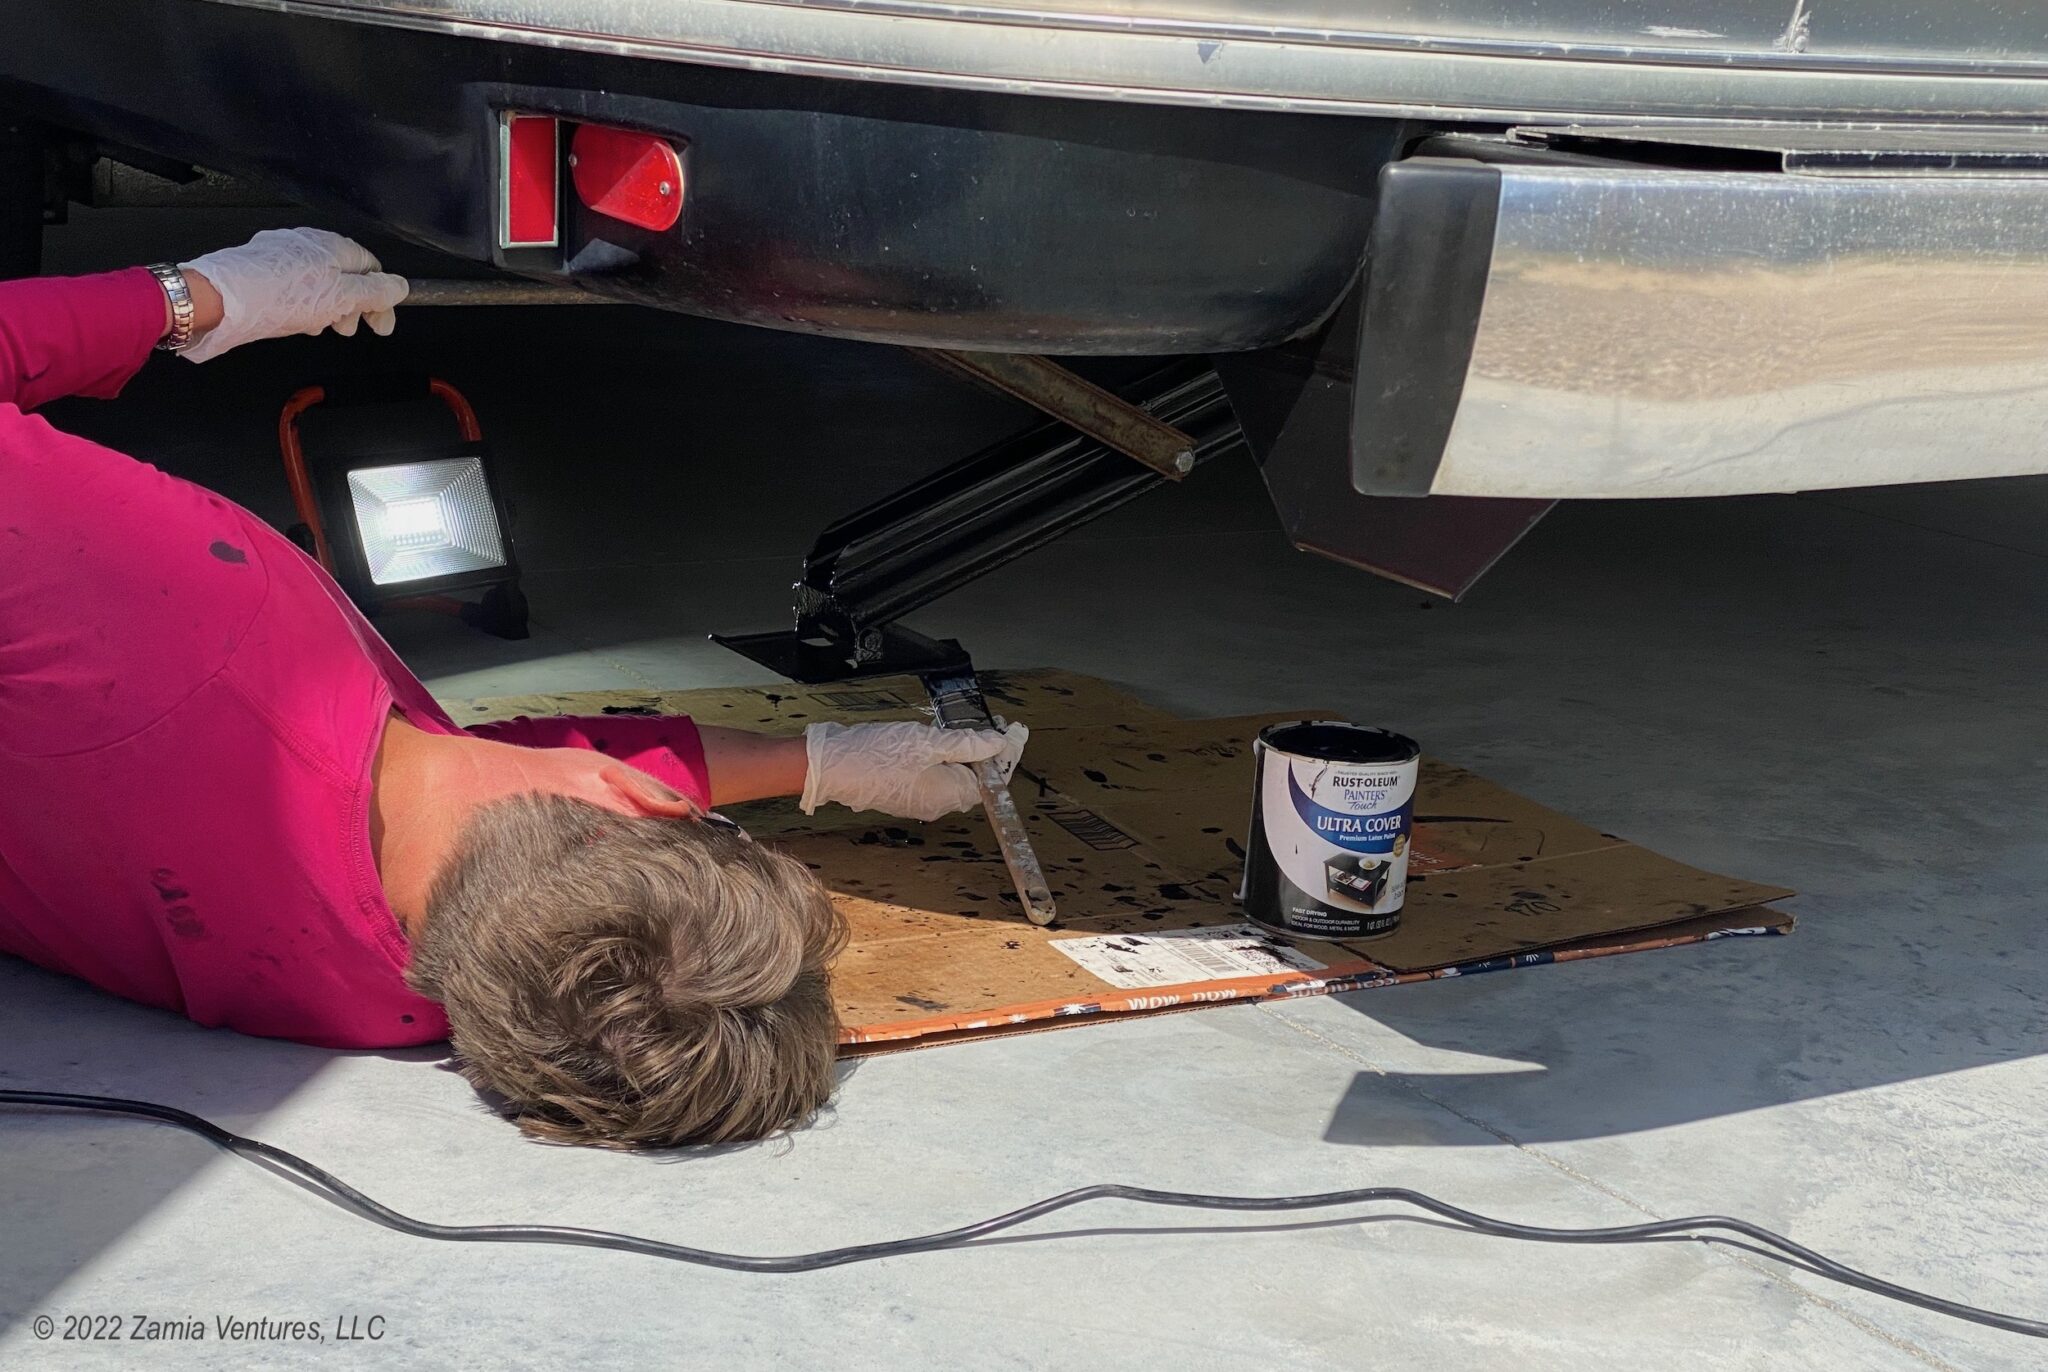
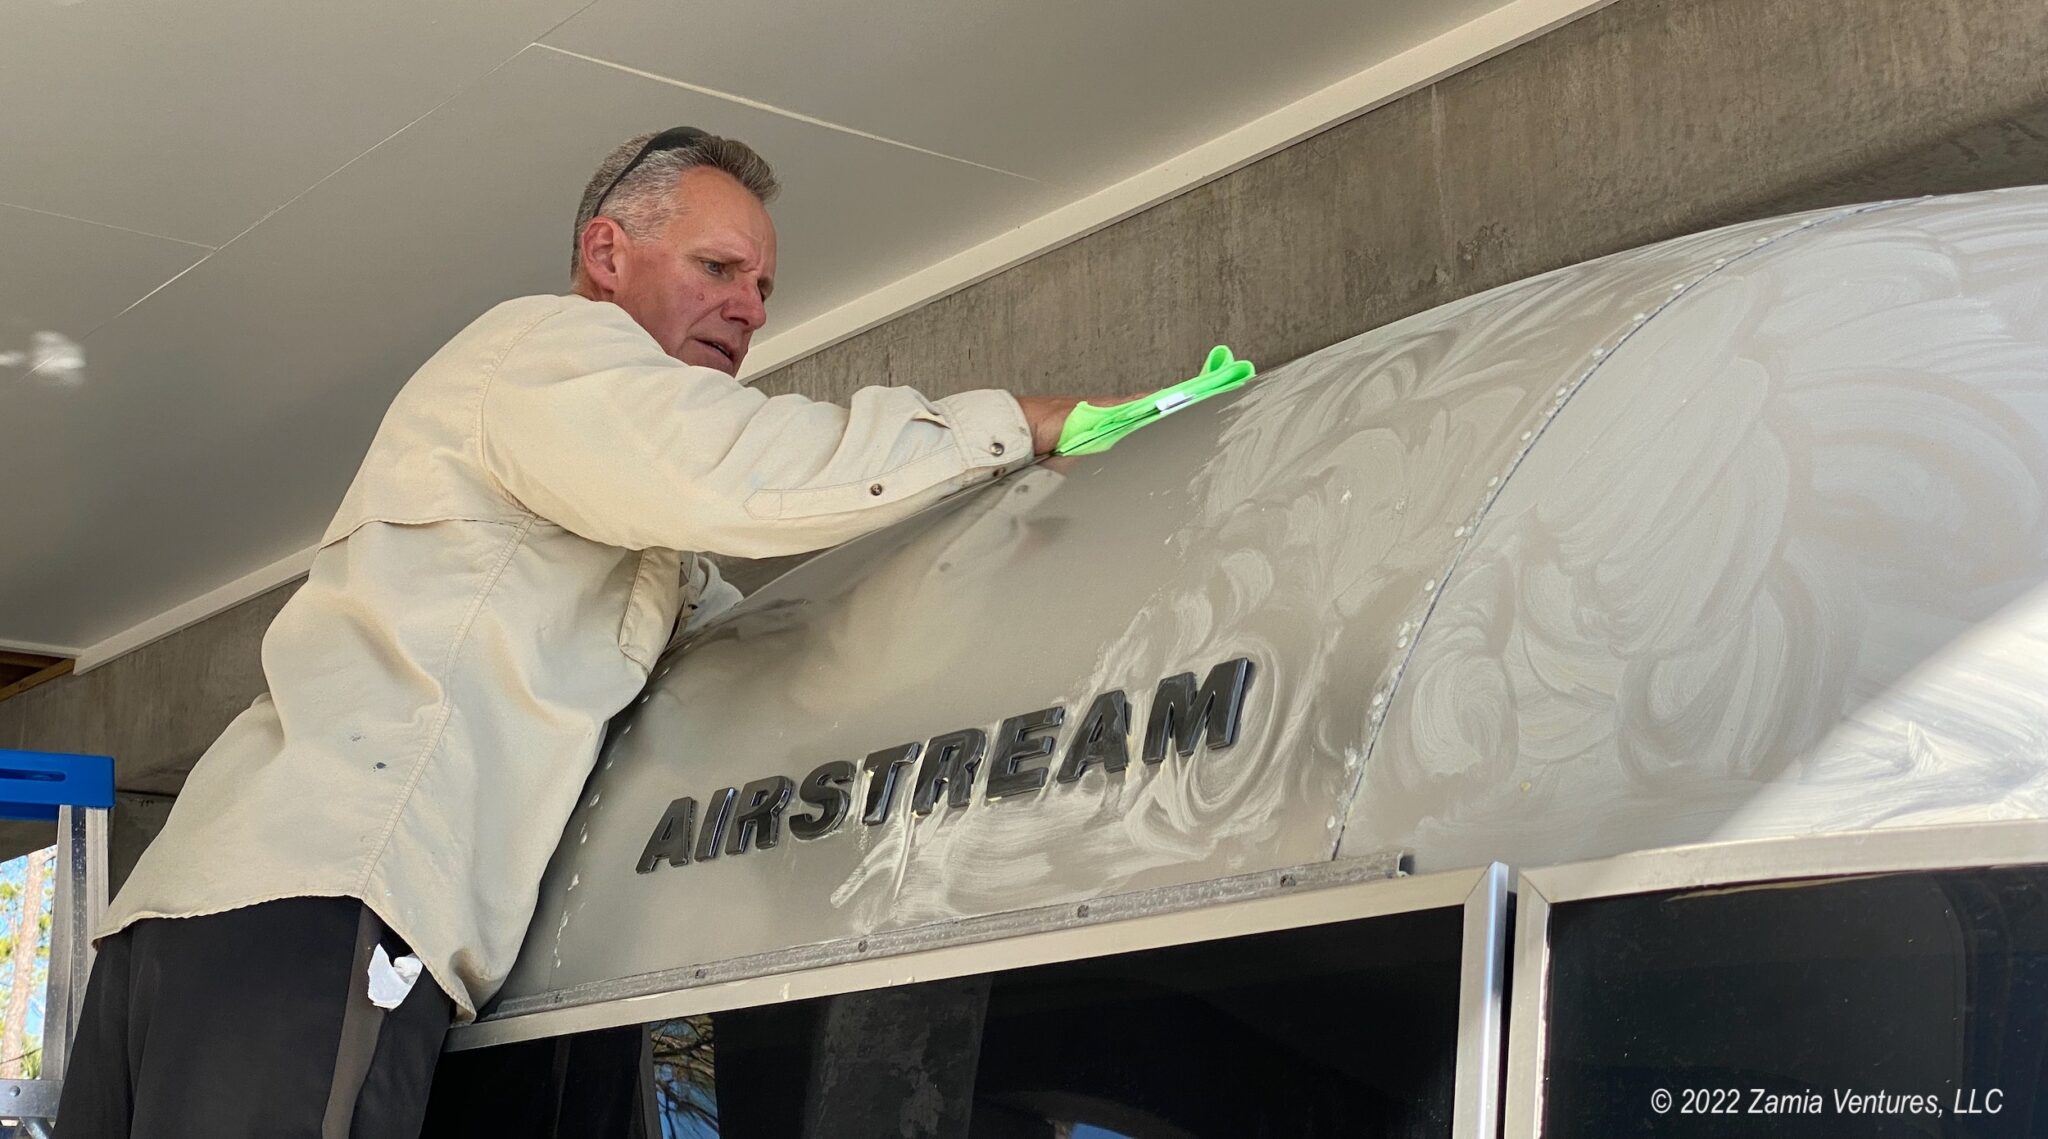
The single biggest issue we needed to address was the consequences of a half decade of rough living in the form of corrosion appearing on many different metal parts. Of which we have a lot, considering the entire rig sits on a metal chassis and is skinned in aluminum, inside and out. Our exterior aluminum is covered in a clear coat, but to increase its protection we gave it a very thorough wash and waxed all the exterior panels using a high quality auto wax. Our 25 foot trailer never felt so long.
The biggest challenge was the corrosion appearing on powdercoated chassis components like our A-frame coupler, rear bumper supports, battery compartment, spare tire holder, stabilizer jacks, and propane tank holders. Before starting the project I spent a lot of time poking around on AirForums, a message board for Airstream enthusiasts. Many of the contributors are car guys (and I do mean guys) who are rebuilding vintage Airstream trailers from scrapyard finds. These guys have — or have friends who have — amazing resources like sandblasting equipment and hermetically sealed car painting rooms. We do not have any of these things, so we went with an approach that we felt we could DIY fairly successfully.


The process for fixing our chassis and other powder coated components involved five steps:
- Wash thoroughly to remove road grime.
- Clean all parts with industrial degreaser.
- Apply a metal prep that dissolves rust and etches metal so treatment will adhere.
- Paint all parts with POR-15 rust preventive treatment to create a solid barrier across the metal.
- Top coat all treated areas, since POR-15 can degrade if exposed to UV.
Between the corrosive metal prep solution, the unwashable POR-15, and the general problem of messy paint, we went through a lot of disposable gloves, new safety goggles, and saying goodbye to old clothes. Plus we got to do all this while squeezing underneath our not-very-elevated rig.


Was this entire project a huge PITA resulting in, among other things, having to cut clumps of POR-15 out of my hair? Yes. Do our chassis and other metal parts look as if the Airstream just rolled off the assembly line? No. Are they much better protected against further corrosion? Yes. Mission accomplished!


The Saga of Air Conditioning
Long-time readers might remember that time we spent a long, hot summer in Florida during pandemic times. While we made good progress on house construction during that time, we also endured several tropical storms with torrential rain in between endless stretches of hot, humid Florida summer weather. Our relatively shade-free campsite left us roasting, since our A/C couldn’t keep up, and this solified my pre-existing view that living in Florida before the invention of air conditioning was insanity. Then our A/C died and I cried.
For the most part we were in a house or enjoying winter weather after this cataclysm, so in the ensuing year and a half we’ve been slowly tinkering around with our air conditioning unit in an effort to get it back to functionality. Many hours of YouTube videos were consulted in preparation for each effort. Each visit to the A/C involved me clambering on top of our curved roof, crab-walking around the solar panels, skylight, and various vents to reach the unit, and wedging myself into an awkward position to open it up and work on it. Then there is the challenge of removing the plastic shroud and several internal covers and panels, all of which seem to require oddly sized tools.


Our saga of A/C woes began with a loud screeching sound when running, which we soon learned was a sign of imminent motor failure. Ask me how we found out. We ordered a replacement motor and waited months to receive it because of parts back orders. When it finally arrived, we found that we lacked the necessary tools to pull out the existing motor. We made an appointment with a friendly mobile RV technician, and he was able to pop the motor in effortlessly. What a difference the right tools make! We turned on the A/C, and heard the motor fire up in a lovely screech-free purr. Success!
Well, not really. After a while we noticed that while the A/C sounded great, it was tripping the circuit breaker when it started. More concerning, there was no cool air coming from the ducts. Uh oh. Back to YouTube, where we got the best information from this excellent troubleshooting video from My RV Works, Inc. which helped us appreciate that our compressor was not turning on. The compressor pulls a huge amount of power when it starts up, and we deduced that the start capacitor was bad so the compressor was not receiving that needed extra jolt of energy. We ordered a new capacitor (in our unit it’s a combination start and run capacitor), went through the whole getting-up-to-the-roof routine, and I happily was able to replace the capacitor without electrocuting myself. Then we fired up the AC, gave it 20 minutes to really get working….


And found that we still did not get cold air. The motor was working, the compressor was working, and the coils were somewhat cold to the touch. But those coils should have been ICY cold, which could only mean one thing: we had lost our refrigerant. Since our unit is a closed system, with refrigerant injected into the coils at the factory and then welded shut, the only option was to replace the entire unit. Friends, I did the YouTube research for “replacing your own RV A/C.” But we had no idea how we would hoist the new unit up onto the roof for installation, we weren’t confident about completing the connections and attaching it securely, and I just couldn’t take it anymore. So that is how we found ourselves at Camping World having the unit replaced in its entirety.

We tested it out when we returned home, and that sweet, sweet cold air pouring out of the ducts has never felt so good.
Deep Cleaning
In between the long, drawn-out projects, Ken took the lead on the herculean task of cleaning. Let me start by sharing a photo I unearthed from the day we first saw our rig at the dealer.

Needless to say, light colored floors, white curtains, and ivory cushions look great at the dealer but don’t look so crisp after five years of mud, rain, pebbles, desert dust, beach sand, tree pollen, etc., plus daily life challenges like cooking spatters. Ken had his work cut out for him.
First there was normal cleaning, wiping down hard-to-reach places like the insides of drawers and cabinets, including the bottom of the pantry and the inside of the refrigerator. The stove and floor got some much-needed deep cleaning. Soft goods like pillows, sheets, and blankets were blasted with high-temperature industrial-style cycles in our washer and dryer. Some items that were too far gone were discarded entirely. Then the cleaning got really serious.


Ken pulled out every single one of our upholstered cushions and washed them thoroughly with soapy water. Stains were attacked with some serious elbow grease. (No naugas were harmed in this process.) Then he extracted all our curtains from their guide rails and gave them the same treatment. Our cushions and curtains have never seemed so extensive. The results here are similar to the chassis corrosion control: it’s not exactly showroom-clean, but there is a very noticeable improvement in appearance.
Restringing Pleated Blinds
In another entry for the category of “Things That Are Way More Annoying Than Necessary” we also repaired a pleated blind on one of our porthole windows. One of the strings had frayed and then snapped, leaving the blind awkwardly tied in place. Once again YouTube came to the rescue, this time with this clear and helpful video from RV Geeks. Our porthole blinds operate similar to day-night shades that are seen in other RVs. The top and bottom rails are attached to the top and bottom of the window frame, while a middle rail slides along the strings. It’s easy to find online diagrams of the stringing pattern for a standard day-night shade (though in our case we have no top fabric).


Simple, right? Well, the fine folks at Airstream threw us yet another curveball with the blinds. In most RV blinds the strings come out of the bottom rail and attach to the wall, which means they can be adjusted after installation if more or less tension is needed for the blinds to move smoothly. In our system, the four strings are actually two strings in two mirror-image loops through the blinds and rails. Because the blinds move upwards from the bottom rail and are held in place by tension, it is critical that the strings are exactly the correct size for the window. And because they are in a closed loop that ties inside the top rail, you will only find out if you measured correctly after you have completely reassembled and reinstalled the blinds. Thanks, Airstream!


After much careful measuring and time-consuming threading of nylon string that tried to disintegrate/unwind at every turn, we finally had the whole unit reassembled and ready to reinstall. Amazingly, it fit on the first try! It was a lot of work for a window blind that is literally 9.5 inches high, and a good reminder that “simple” modern furnishings are often more complicated than they seem. Ken has vowed never to open the blinds again, lest they require further repairs.
Miscellany
We also did a bunch of routine maintenance that is not difficult or exciting but can be time-consuming when you put it all together, such as:
- Sanitizing our fresh water tank, internal water lines, and hoses
- Replacing water filters
- Getting all tires to the correct pressure, including the spare that rides in the undercarriage
- Lubricating stairs, jacks, hitch, window latches, door hinges, and other moving parts
- Replacing weather stripping around the screen door
I was just relieved that none of these required hours of YouTube viewing; my list of recommended videos is already a horror show of everything that can go wrong with an RV.
Almost Ready to Hitch Up!
Now that the rig is all sparkly and new-ish looking, we are almost ready to roll. We point our nose north June 14, and we are excited about the upcoming change of scenery and adventures ahead. But first we have a lot of packing to do.


I’m so very impressed that you tackled these tasks on your own! Kudos on a job well done, and bon voyage!
I have no idea what people did before YouTube instructional videos – we learned so much! But we also know our limits, I think.
I’m excited to get back on the road and start travel blogging again!
I’m exhausted just reading this. And I’m afraid to look under our trailer, LOL!! Seriously, I’m extremely impressed at all that you two tackled. But your effort and tenacity definitely paid off! It’s a bummer that after all of your attempts at various fixes that the A/C ultimately needed to be replaced. I’m glad you didn’t try to do that yourself.
Although I’m willing to do deep cleaning and interior decorating projects (haha), and Eric has replaced the toilet in our rig (twice!!) and spent hours beneath the rig replacing all of the insulation, I don’t know that I would ever have the fortitude to do rust remediation. Especially after seeing that wicked stuff on your face that took weeks to wear off, and knowing that you had to cut chunks out of your hair. And Ken replacing those blind strings? I watched a YouTube video and tried my hand at it. I ended up ordering new blinds (but we really needed new ones anyway. At least that’s my story and I’m sticking to it).
All these projects were much like our house build — extremely annoying while they were going on, but in the end we were pleased with the results. It has given the Airstream a whole new lease on life, I think, and we’re really going to enjoy getting back on the road in a much cleaner, sharper looking rig. With functioning blinds, even! And A/C! I think that packing the rig for just one season of camping is going to be a lot easier than hauling all our earthly possessions around with us, including clothing and gear for all four seasons and every possible activity. But I’m sure it will still be a mad rush before we can finally hitch up and go.
great team effort !! wow, didn’t know there was so much to it. Hours upon hours . Looks great though and almost good as new ! congrats on all the countless Youtube videos you must have watched.
The trailer is basically a tiny house that undergoes earthquake conditions every time we move…. so there is ALWAYS something to be fixed. Luckily YouTube is there to help us out on our many projects.
I *do* think the rust remediation makes it looks like new! What a total PITA, not to mention the hair loss (!), but what satisfying results. TBG restrung every window shade in our rig last year, so I know what a laborious process that is. Man, you gave that A/C the old college try! At least is was able to be fixed ultimately, so I guess that’s the takeaway. If it doesn’t get really hot on your summer adventures, I’m going to be pissed for you! 😀 Anyhow, it all looks great, and most importantly, you’ll have comfort and peace of mind for your travels.
All this work was definitely in the category of “tough but rewarding.” We’re happy with the results and it will feel like a brand new rig when we travel this summer! At least that’s the plan. And we are definitely going to need the A/C on our way north this summer. The Great Lakes might be wonderfully pleasant but I am guessing Alabama in June will be hot and sticky — the perfect place to use our new A/C.
The underside of the rig rusts, huh? Interesting…. I will make sure to never look under ours because I absolutely do not want to know what is going on under there.
You are 100% right about Youtube. I cannot begin to tell you the number of times Kevin has said: “Uh oh…. we might need to bring the rig in to deal with this [issue]…” Then, he says “let me just look into it for a couple minutes, then he goes to Youtube, then he disappears outside for 20 minutes, and then he returns to say “it’s fixed.”
Over and over and over.
Youtube is truly a marvel.
Seriously – nice work on all this. It’ll be that much more rewarding and comfortable to hit the road in a like-new Airstream and know that you did all the work to make it that way. You guys are in for a terrific Summer!
I have to say, it’s amazing how many problems can mostly be ignored while on the road and busy with other things. All that time spent researching campgrounds, museums, driving routes, etc. is time you don’t have to look underneath the rig! But being stationary for a while definitely gave us the opportunity to address some issues that we were putting off for a while. In your case, of course, you just need to get the rig looking good enough to pass it along to a new owner who can deal with stuff on their own time. No matter the age or quality of the initial build, there is always something to be dealt with. Thank goodness for YouTube!